Check your computer's specifications if you are unsure if it has built-in USB ports.
See the iPhoto Device Compatibility page to see if your camera or media reader is compatible with iPhoto.
Using advanced options when importing from a hard disk:
By default, iPhoto copies photos imported from your hard disk, leaving the originals in their original location and making duplicates for use in the iPhoto library.
However, if you already have an extensive collection of photos saved on your computer and you prefer to leave your photos in their current file structure, you can choose to have iPhoto point to your original photo files instead of copying them in iPhoto. Either way, you can still make full use of iPhoto.
If there is no color profile embedded in a photo viewed in iPhoto (many digital cameras do not include a color profile with an image), iPhoto temporarily assigns a ColorSync profile that helps display the photo properly within the application. If your photo already has a color profile embedded, iPhoto will use that color profile.
To set advanced options for photos imported from your hard disk:
- Choose iPhoto > Preferences
- Click Advanced.
- Select or deselect "Copy files to iPhoto Library folder when adding to library." Deselecting this option means that iPhoto will not duplicate photos when importing them into the application, but will leave them in their original files on your computer. When you edit these images in iPhoto, however, the edited versions will be saved in the iPhoto library, not your original files. Your original files remain untouched.
- If you selected "Copy files," select or deselect "Add ColorSync profile." The profile assigned will usually be "cameraRGB," an Apple-specific version of the commonly used sRGB, which allows image colors to map more closely to Apple monitors. If your image file settings specify the use of Adobe RGB, iPhoto assigns that profile. If another color profile is already embedded, iPhoto uses the profile provided.
Importing photos from a compatible digital camera:
- Connect the camera to the computer's USB port using a USB cable.
- Launch iPhoto from your dock or from the Applications folder. iPhoto may also launch automatically if you set it as the default application to manage pictures.
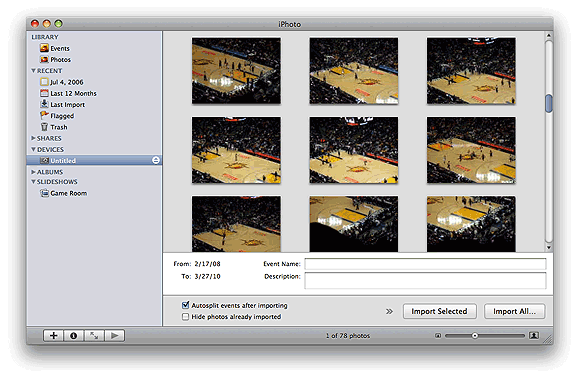
- In the source panel, click on your camera name under Devices.
- Click the Import All button to import everything or press command and click on specific pictures you want to import and click Import Selected.
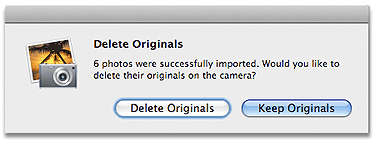
5. iPhoto will ask if you want to keep or delete the originals after the import is finished.
 6. After you are finished, click the Eject button next to your camera's name.
Turn off your camera and disconnect it from the computer.
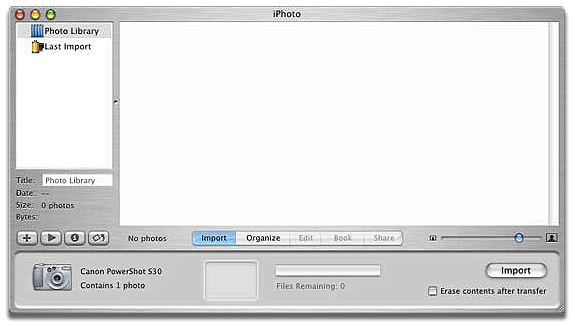
For iPhoto 06 or earlier, you will see the Import pane:
- Click the Import button to import all your pictures.
- To delete photos from your camera as soon as they are imported, select "Erase contents after transfer" at the bottom right of the Import pane to enable that option.
- After you finish importing your photos, drag the camera's icon from the Finder desktop to the Trash if necessary, turn off your camera, then disconnect it from the computer.
Importing photos from a media reader or iPod (with Dock Connector) and the Belkin iPod Media Reader:
- Insert the media into the media reader or connect your iPod.
- Launch iPhoto from your dock or the Applications folder.
- In source panel, click on the camera icon underneath Devices.
- Click Import All or pick and choose specific pictures then click Import Selected.
- Click the Eject button next to the camera icon or drag and drop the media icon on the desktop into the trash.
- Click the Import button.
- To delete photos from your camera as soon as they are imported, select "Erase contents after transfer" at the bottom right of the Import pane to enable that option.
- After you finish importing your photos, eject the media by dragging its icon to the Trash.
Importing photos from other sources:
- Choose Import to Library from the File menu.
- Select either the individual photos you want to import, or select an entire folder or disk, then click Open. To select multiple photos or folders without selecting all, press and hold the Command key while clicking on photos.
- Each imported item, whether a single photo or an entire disk will appear as a separate film roll. Command-clicking on multiple items during an import will result in them all appearing on the same film roll.
- If importing files from a local hard drive, see "iPhoto: About Importing Pictures From Hard Disk and Available Space"
- Processed photos that are offered for download from an Internet site must first be downloaded to a local drive before they can be imported into iPhoto.
- Do not copy or move pictures directly into the iPhoto Library folder as they will not appear as an option in iPhoto when attempting to import.