 Working with RAW images:
Does iPhoto actually use RAW image data?
All I see are JPEG copies of my RAW images.
That's a great question—yes, it certainly does, and its unique process helps simplify the RAW workflow for people who don't have time to be photo experts. The first time you edit a RAW image in the main iPhoto window, the RAW badge appears at the bottom of the window.
It looks like this:
 When the badge appears, iPhoto is using your image's original RAW data to support your edits. After you click Done, your changes are applied to the RAW image data and stored as a JPEG file (the original RAW file remains unchanged). That's how iPhoto simplifies the RAW workflow—it combines RAW editing and JPEG conversion into one step.
If you use an expert program like Adobe Photoshop, you would have to make your RAW adjustments, then run a separate batch process to convert all your images to a working format, such as JPEG or TIFF. iPhoto simplifies all that.
Note: If you edit the photo again, the RAW badge won't appear because the image is now a JPEG file. To re-edit the same image from RAW, select the image and choose Revert to Original from the Photos menu. If you want to keep your first edit, choose Duplicate before reverting.
Why doesn't iPhoto display the RAW badge when I open an original RAW image in a separate Edit window?
It should, but it currently doesn't. This is an issue that we're working to resolve. Until we do, you can avoid confusion by doing all your RAW editing work in the main window.
Why does iPhoto have to convert RAW files to JPEG?
Remember that RAW is a reference or "digital negative" format; not a working format. In other words, you can't print directly from a RAW file, for example. Furthermore, other programs, such as iMovie and System Preferences, do not understand RAW. That's why iPhoto makes a JPEG copy of your RAW image at the time of import.
Can I export a 16-bit image or an XMP file from iPhoto?
At the present time, iPhoto cannot export 16-bit color or XMP (Extensible Metadata Platform) files. If you export an image as a TIFF file, the resulting photo will be an 8-bit TIFF derived from your edited JPEG image. The iPhoto RAW workflow is designed for simplicity—not expert level control. If you export a photo as an original RAW image file (by choosing Original as the image format in the Export Photos dialog), you will get an unmodified RAW file without an XMP sidecar (no metadata will be embedded into the file).
When I export a RAW file from iPhoto, why aren't my changes saved as part of the export?
In the RAW photo ethic, a RAW file is regarded as a "digital negative" and is not to be modified. Changes that you make when editing in RAW mode are always saved to a secondary file. In iPhoto, that secondary file is a JPEG. In Adobe Photoshop, the secondary file is an XMP sidecar file.
What is the advantage of shooting images in RAW format?
Images captured in RAW format allow for greater image quality and editing flexibility when you bring them into an image editor, such as iPhoto. RAW is like having insurance against your shooting mistakes—your camera settings are saved separately from the image data. For a more thorough explanation of RAW images, click iPhoto 5: Using the RAW image format.
iPhoto uses the 16-bit RAW data to facilitate your edits before converting the RAW file to JPEG. This gives you greater editing flexibility since a RAW image's exposure latitude is retained, which is not the case if you simply imported a JPEG file.
Why do RAW images take so much longer to import than JPEGs?
RAW images take longer to import because iPhoto makes a JPEG copy at the time of import. The JPEG conversion allows other parts of Mac OS X, which don't understand the RAW format, to use your images even before you edit them.
My camera isn't on your list for RAW support. Why don't you support it?
Qualifying a camera for RAW compatibility takes a lot of testing, and software must be customized as we add more cameras. Because this is the first iPhoto release to support RAW images, we focused on single-lens reflex (SLR) type cameras and a few others that are most likely to be used by the high-end amateurs and professionals who value the qualities of the RAW format. We expect to add more cameras to the list with future releases of iPhoto.
My blazing fast Mac slows down when I try to browse my RAW photos. What gives?
To maintain a fast browsing speed, iPhoto displays thumbnail images, which are smaller copies of the originals. However, you can easily exceed the thumbnails' maximum set size when you move the iPhoto zoom slider to display bigger thumbnails. When you do this, iPhoto suddenly has to go to the original image file and scale it to fit your screen, in realtime, as you scroll. For example, if all your thumbnails are around 30 KB each and your original images are around 3 MB a piece, you've just increased the size of all images being browsed by 100 times! That's not an easy jump even for a Power Mac G5. This is true regardless of whether the images you're browsing are RAW or JPEG images.
You might be wondering how you can constrain iPhoto to display only the maximum thumbnail size. Lucky for you, it's really easy: When you're browsing your photos, just press the 2 key on your keyboard. This will resize your thumbnails to the maximum size.
Working with slideshows:
I created a slideshow in an album (by clicking the slideshow button), but the next time I tried to view it, all the slideshow changes I made were gone! Where did they go?
iPhoto 5 has two different kinds of slideshows, and you probably confused the old kind with the new one. (Don't worry, a few of us did that too.)
Look at the bottom of your Source list (the column on the left side of the window).
With iPhoto's new "cinematic" slideshow, all slideshows appear as their own entries in the Source list; you'll probably see that you've created more than one copy of your slideshow there. Each copy will still have the changes that you saved in it.
Just pick the one you want to keep, and delete all the extras.
What types of slideshows can I make in iPhoto?
You have two choices. In older versions of iPhoto, you could play an album as a slideshow, and the album could even retain slideshow settings. You can still do that, but you can also create an improved type of slideshow that exists on its own in the Source list. These highly customizable "cinematic" slideshows allow mixed transitions, varied slide durations, and the pan-zoom Ken Burns effect, for example.
When you click the Slideshow button, iPhoto creates one of the new slideshows in the Source List, like "London Slideshow" in this picture.
 The old type of slideshow is still there too, but its control has moved. Select a regular album, then click the Play button at the bottom left corner of the iPhoto window. When you click this Play button, you'll get the older, familiar format.
Why does iPhoto display two Play buttons when I'm working on a slideshow?
The round Play button only appears when you're editing a cinematic slideshow, and is used to control its playback. The rectangular Play button is used to play the old-style slideshows that don't appear in the Source list (you can ignore it when editing a cinematic slideshow).
Does the Ken Burns effect soften my photos?
Because Ken Burns images are animated, iPhoto must scale them down to ensure reasonable performance on a range of computers. This will cause some images to look softer than they actually are, though the softening effect may not be noticeable on lower-resolution displays. For example, a landscape-oriented (horizontal) Ken Burns-effected image on an Apple 20-inch Cinema Display (1680 pixels wide) would be downsampled to an animation texture of about 1024 pixels, and then rescaled to fill the screen. This should be more noticeable than if you were viewing the slideshow on a display that was only 1024 pixels wide.
Importing:
Photos can be imported from a digital camera if both your computer and your camera have built-in USB ports and your camera is compatible with iPhoto.
Check your computer's specifications if you are unsure if it has built-in USB ports.
See the iPhoto Device Compatibility page to see if your camera or media reader is compatible with iPhoto.
Importing photos from a compatible digital camera:
- Connect the camera to the computer's USB port using a USB cable.
- Launch iPhoto from your dock or from the Applications folder. iPhoto may also launch automatically if you set it as the default application to manage pictures.
- In the source panel, click on your camera name under Devices.
- Click the Import All button to import everything or press command and click on specific pictures you want to import and click Import Selected.
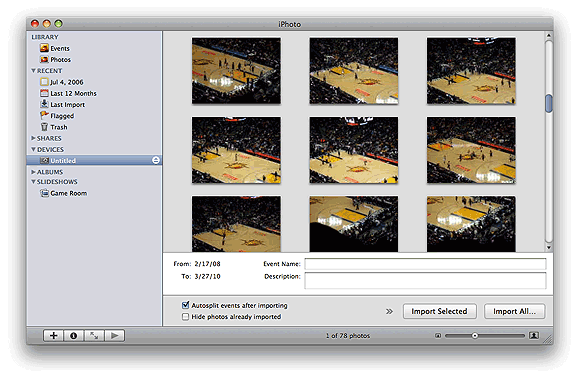
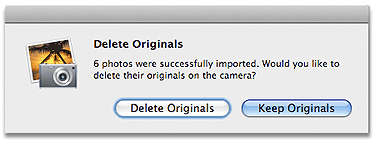
5. iPhoto will ask if you want to keep or delete the originals after the import is finished.
 6. After you are finished, click the Eject button next to your camera's name.
Turn off your camera and disconnect it from the computer.
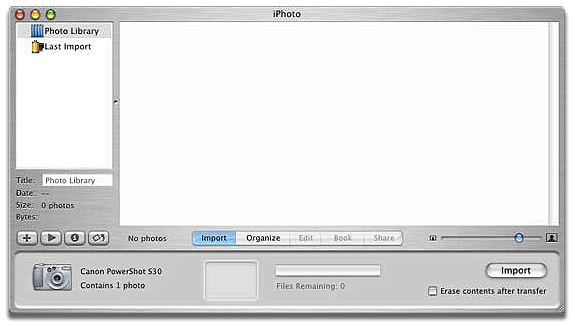
For iPhoto 06 or earlier, you will see the Import pane.
Click the Import button to import all your pictures.
To delete photos from your camera as soon as they are imported, select "Erase contents after transfer" at the bottom right of the Import pane to enable that option.
After you finish importing your photos, drag the camera's icon from the Finder desktop to the Trash if necessary, turn off your camera, then disconnect it from the computer.
Importing photos from a media reader or iPod (with Dock Connector) and the Belkin iPod Media Reader:
- Insert the media into the media reader or connect your iPod.
- Launch iPhoto from your dock or the Applications folder.
- In source panel, click on the camera icon underneath Devices.
- Click Import All or pick and choose specific pictures then click Import Selected.
- Click the Eject button next to the camera icon or drag and drop the media icon on the desktop into the trash.
For iPhoto 06 or earlier you will see the Import pane.
Click the Import button.
To delete photos from your camera as soon as they are imported, select "Erase contents after transfer" at the bottom right of the Import pane to enable that option.
After you finish importing your photos, eject the media by dragging its icon to the Trash.
Some readers may physically eject the media while others may require that you manually eject the media. If you must manually eject the media, wait until the media icon is gone from the Finder Desktop. For more information about importing photos from an iPod, see "iPod (with Dock Connector): Use Disk Mode to Copy Photos."
Importing photos from other sources:
- Choose Import to Library from the File menu.
- Select either the individual photos you want to import, or select an entire folder or disk, then click Open. To select multiple photos or folders without selecting all, press and hold the Command key while clicking on photos.
Notes on importing from other sources:
- Each imported item, whether a single photo or an entire disk will appear as a separate film roll. Command-clicking on multiple items during an import will result in them all appearing on the same film roll.
- If importing files from a local hard drive, see "iPhoto: About Importing Pictures From Hard Disk and Available Space"
- Processed photos that are offered for download from an Internet site must first be downloaded to a local drive before they can be imported into iPhoto.
- Do not copy or move pictures directly into the iPhoto Library folder as they will not appear as an option in iPhoto when attempting to import.
Exporting:
You can export photos from your photo library or an album so you can send them to others or import them into another application.
To export photos:
- Select the photo or photos you want to export.
- From the File menu, choose Export.
- Click the File Export tab.
- If necessary, scale images to a specific size by specifying a maximum width and height.
- Click Export.
- Choose a location for the photos you are exporting, then click OK.
Cropping:
Cropping photos:
 Important: Cropping a photo changes its appearance in the photo library and in every album, slideshow, book, calendar, and card where it appears.
 To edit a photo without changing it everywhere it appears, make a duplicate to edit by selecting the photo and choosing Photos > Duplicate.
Here are some tips:
- If you’re working in your library or an album, select the photo you want to crop and click the Edit button.
- If you’re working in a slideshow, book, calendar, or card, double-click the photo you want to crop in the photo browser. This switches the photo to edit view.
- If you want to crop to a specific photo dimension, select the Constrain checkbox and select a dimension from the pop-up menu, such as a square photo or a 4 x 6 postcard.
- If you plan to use the photo in a book, choose 4 x 3 (Book).
- If you plan to use the photo as your desktop picture, choose Display to fit the photo to your monitor screen.
- If you want to do a custom crop, deselect the Constrain checkbox.
Drag the selection window to the position you want; drag it larger or smaller to enclose the desired area.
Click the Apply button in the Crop pop-up window.
To save your crop, click the Done button to return to the previous view, click the arrow key to move to the next photo, or select a new photo to edit from the photo browser at the top of the iPhoto window. (If you don’t see a row of photos at the top of the window, choose View > Thumbnails.)
If you don’t like a change you’ve made to a photo, you can undo your most recent change by choosing Edit > Undo.
For photos edited in iPhoto ’08, you can also change the crop at any time without losing your other edits, simply by opening the photo in Edit view and clicking the Crop button.
iPhoto always retains the original photo you imported, so you can change a photo back at any time by choosing Photos > “Revert to Original.”
If you are editing RAW-format photos, choose Photos > Reprocess RAW.
About Cropping:
Cropping allows you to edit a photo by selecting only the portion you like. You can also use cropping to improve a photo's composition. The ratio of width to height in photographic prints is known as the aspect ratio.
The aspect ratio is important to know when cropping because when ordering prints or a book, photos must match the required aspect ratio or they may be cropped.
For 35 mm pictures the aspect ratio is 2:3 which will produce photos of 4 x 6 in. If you intend to use the same photo to get multiple size prints, you may need to duplicate the photo and constrain and crop to the specific size prints being ordered.
Warning: Cropping a photo changes its appearance in the photo library and in every album where it appears. To edit a photo without changing it everywhere it appears, make a duplicate to edit.
Crop a photo:

- Select the photo you want to crop.
- Click the Edit button.
- Position the arrow pointer at one corner of the area you want to select, then drag to enclose the desired area. To constrain your selection to a specific size ratio, choose a ratio from the Constrain pop-up menu before dragging to enclose the desired area. If you're ordering larger prints, choose the appropriate size (5 x 7 or 8 x 10) to constrain the image.
- Click the Crop icon in the Edit pane.
Deleting:
Deleting a folder, album, book, calendar, card, or slideshow:
There are several ways to delete an Event from your iPhoto library.
To delete an Event:
Select the Event, then do one of the following:
- Press Command-Delete.
- Drag the Event to iPhoto Trash.
- Choose Photos > “Move to Trash.”
You can retrieve your photos from iPhoto Trash until you empty the Trash, which deletes your photos permanently. To empty iPhoto Trash, select it in the Source list, and then choose iPhoto > Empty Trash.
If you delete an Event by mistake, click Edit > “Undo Move to Trash.”
If this option is dimmed, select iPhoto Trash in the Source list, select the photos you want, and drag them to Photos in the Source list.

You can delete a folder, album, book, calendar, card, or slideshow you’ve created without removing its photos from the photo library.
To delete items from the Source list:
To delete text:
Deleting a photo from the library:
Warning: Deleting a photo from your library also removes it from any album, slideshow, book, calendar, or card in which it appears.
To delete a photo from the library:
If you change your mind about deleting a photo before you empty the Trash, select the Trash, select the photo, and then choose Photos > Restore to Photo Library. You can also drag the item out of the Trash before you choose Empty Trash.
Removing photos from an album:
You can remove photos from an album you’ve created without deleting the photos from your photo library.
To remove photos:
If you remove a photo from an album by mistake, choose Edit > Undo to restore it.
Removing a page from a book:
To remove a page from a book:
Removing a photo from a calendar:
Here are ways to remove photos from a calendar:
Removing a photo from a greeting card:
Here are ways to remove photos from a card:
Removing a photo from a book:
Here are ways to remove photos from a book:
To delete items from the Source list:
- Select the folder, album, book, calendar, card, or slideshow.
- Press the Delete key.
To delete text:
- Select the text and press the Delete key.
Deleting a photo from the library:
Warning: Deleting a photo from your library also removes it from any album, slideshow, book, calendar, or card in which it appears.
To delete a photo from the library:
- Select the photo you want to delete.
- Press the Delete key.
- Choose iPhoto > Empty Trash.
If you change your mind about deleting a photo before you empty the Trash, select the Trash, select the photo, and then choose Photos > Restore to Photo Library. You can also drag the item out of the Trash before you choose Empty Trash.
Removing photos from an album:
You can remove photos from an album you’ve created without deleting the photos from your photo library.
To remove photos:
- Select the album.
- Click to select the photos you want to remove.
- To remove a photo from a regular album, press the Delete key. This removes the photo only from that album, not other albums or your library.
- To move a photo from a regular album or Smart Album to the Trash, press Command-Option-Delete. (This also removes the photo from the library and from every album, slideshow, and book where it appears.)
If you remove a photo from an album by mistake, choose Edit > Undo to restore it.
Removing a page from a book:
To remove a page from a book:
- Click the Page View button to display book pages in page view.
- Select the page you want to remove.
- Press Delete.
Removing a photo from a calendar:
Here are ways to remove photos from a calendar:
- To remove a photo from a calendar page, select the photo and press Delete. The photo remains in the photo browser.
- To remove a photo from the photo browser, select the photo in the browser and press Delete.
Removing a photo from a greeting card:
Here are ways to remove photos from a card:
- To remove a photo from a card, select the photo and press Delete. The photo remains in the photo browser.
- To remove a photo from the photo browser, select the photo in the browser and press Delete.
Removing a photo from a book:
Here are ways to remove photos from a book:
- To remove a photo from a book page, select the photo and press Delete. The photo remains in the photo browser.
- To remove a photo from the photo browser, click the Photo browser button, select the photo, and press Delete.
Creating:
 Creating a CD or DVD:
You can use the iPhoto burn feature to archive your photos and albums for viewing in iPhoto only.
If you want to create a disc to be viewed on a Windows computer or by a photo processing company, you must use the Finder.
To create a CD or DVD using the Finder:
- In iPhoto, select the album or albums you want to burn to a disc.
- Export the album or albums to a folder on your computer.
- When the export is finished, quit iPhoto.
- Click the Finder icon in the Dock and insert a CD-RW disc or a blank CD-R or DVD-R disc into your drive.
- Drag the folder that contains your exported photos onto the disc’s icon.
- When the files have finished copying, choose File > Burn Disc, and then click Burn.
Creating a customized Event:
To create an Event:
- Select Photos in the Source list.
- Select the photos you want in your customized Event. Command-click to select non-adjacent photos.
- Choose Events > Create Event.
- In the dialog, click Create.
Note: You can also create an empty Event, and move photos into it later.
To do so:
- click Events in the Source list, and then click the New Event button in the toolbar, or choose Events > Create Event.
Creating a Smart Album:
Smart Albums allow you to have albums created automatically from specific photos in your library. You can make a Smart Album that contains only certain types of photos, photos with high ratings, or photos that match other criteria, including EXIF information, such as a specific shutter speed or camera model.
For example, you can create an album that contains only your highest-rated photos taken within the last two months on your digital SLR camera.
To create a Smart Album:
- Click the Add (+) button in the bottom-left corner of the iPhoto window, then click New Smart Album in the dialog. You can also choose File > New Smart Album.

- Type a name for your album in the “Smart Album name” field.
- Use the pop-up menus to choose the criteria by which photos will be added to the album. For example, you might want iPhoto to add only photos that contain “Kids” as a keyword, or photos with at least a four-star rating. To add additional matching criteria, click the Add (+) button.
- Click OK.

Any photos in your library that match the settings you chose are added to the album.
iPhoto automatically modifies a Smart Album when any photo that matches the album’s settings is added to or removed from your library.
You can search for photos using the criteria, including EXIF information, that you use to organize the albums.
Creating a greeting card:
You can choose from a variety of greeting card sizes and designs to create a card for any occasion.
To create a greeting card:
- Select one or more photos that you want to use in your card.
- Click the Add (+) button in the bottom-left corner of the iPhoto window, then click Card in the dialog.
- Type a name for your card.
- Choose a card type from the pop-up menu.
- Select an occasion (for example, Baby/Kids or Invitation/Thank You) in the list on the left.
- Select a design for your card in the themes list on the right. If you want to go to the iPhoto website to see detailed descriptions and pricing, click the Options + Prices button.
- Click Choose. iPhoto switches to card view, and your new card appears in the Source list.
- Drag a photo from the top of the iPhoto window onto your card page.
If you see angle brackets (>>) near the bottom-right corner of the window, some of the tools are hidden.
Click the angle brackets to see them, or drag the resize control in the bottom-right corner of the window to make the window wider.
Creating folders in the Source list:
You can add folders to the iPhoto Source list to better organize your albums. You cannot add individual photos directly to a folder.
To create a folder:
- Choose File > New Folder.
- Type a name for the folder and press Return.
- In the Source list, drag albums, books, calendars, cards, slideshows, or other folders into the folder you just created.
Creating a standard photo album:
You can create standard albums to better organize your photo library, group the photos you want to burn to CD or DVD, or choose pictures for a webpage.
To create a standard photo album:
- Click the Add (+) button in the bottom-left corner of the iPhoto window, then click Album in the dialog. You can also Choose File > New Album.
- Type a name for your album and click Create. The album appears in your Source list.
- Click Events, then drag entire Events or photos within one or more Events to your new album.
When you add a photo to an album from another location on your hard disk, iPhoto automatically imports it into your photo library.
You can also select the photos you want to group first, then create a standard album from them.
To do this:
- Command-click to select all the photos you want to include in the album, then choose File > New Album From Selection and name your album.
iPhoto creates an album with the folder’s name and imports all photos contained in the folder.
Creating a book:
You can choose from a variety of book sizes and designs to create a book for any occasion.
To create a book:
- Select one or more albums, or a group of photos, that you want in your book.
- Click the Add (+) button in the bottom-left corner of the iPhoto window, then click Book in the dialog.
- Type a name for your book.
- Choose a hardcover, softcover, or wirebound softcover book size from the Book Type pop-up menu.
- Select a design for your book from the scrolling themes list. When you select a book theme, you can see an example of it to the right of the themes list. Some themes offer text; some don’t. If you want to go to the iPhoto website to see detailed book descriptions and pricing, click the Options + Prices button.
- Click Choose. iPhoto switches to book view, and your new book appears in the Source list.
- Drag photos from the top of the iPhoto window onto your book pages.
Once you create a book, you can change the order of pages or photos, add and change the appearance of text, and even customize the design of individual pages.
If you chose a hardcover book and want photos to be printed on only one side of your book pages, click the Settings button in the toolbar and deselect the “Double-sided pages” checkbox.
If you see angle brackets (>>) near the bottom-right corner of the window, some of the tools are hidden.
Click the angle brackets to see them, or drag the resize control in the bottom-right corner of the window to make the window wider.
Creating a calendar:
You can choose from a variety of themes to create a calendar for any occasion.
To create a calendar:
- Select one or more albums, or a group of photos, that you want in your calendar.
- Click the Add (+) button in the bottom-left corner of the iPhoto window, then click Calendar in the dialog.
- Type a name for your calendar.
- Select a design for your calendar from the scrolling themes list. When you select a theme, you can see an example of it to the right of the themes list. Some themes offer text; some don’t. If you want to go to the iPhoto website to see detailed descriptions and pricing, click the Options + Prices button.
- Click Choose.
- Choose the month and year you want your calendar to begin with.
- Choose the number of months you want your calendar to include (up to 24).
- Choose the national holidays you want to appear in your calendar.
- Choose one or more iCal calendars that you want to have imported into your iPhoto calendar. (If you don’t use iCal, you won’t see anything in the “Import iCal calendars” field.)
- Click OK. iPhoto switches to calendar view, and your new calendar appears in the Source list.
- Drag photos from the left of the iPhoto window onto your calendar pages. If you want iPhoto to automatically design your calendar by arranging the selected photos on each page for you, click the Autoflow button.
If you see angle brackets (>>) near the bottom-right corner of the window, some of the tools are hidden.
Click the angle brackets to see them, or drag the resize control in the bottom-right corner of the window to make the window wider.
Creating a slideshow:
To create a slideshow:
- Select an album or group of photos you want in your slideshow.
- Click the Add (+) button in the bottom-left corner of the iPhoto window, then click Slideshow in the dialog.
- Type a name for your slideshow.
- If you want, deselect the “Use selected items in new slideshow” checkbox.
- Click Create.
- Drag photos into the order you want in the photo browser at the top of the iPhoto viewing area.
When you add a photo to a slideshow from another location on your hard disk, iPhoto automatically imports it into your photo library.
You can choose music, specify the display duration for each slide, choose transition effects, display slideshow controls, and set other options. (See Related Topics below.)
You can also view selected photos as a temporary slideshow without creating a slideshow in the Source list.
To do this:
- Select a folder, album, or group of photos and click the Play button at the bottom-left corner of the iPhoto window.
Creating a new photo library:
You can create multiple photo libraries to organize your photos, albums, slideshows, books, calendars, and cards.
To create a new photo library:
- Quit iPhoto.
- Rename your current iPhoto Library in the Finder or move it to a new location on your hard disk (see Related Topics below).
- Open iPhoto.
- Click Create Library in the dialog that appears.
- Type a name and choose a location for your new photo library.
- Click Save.
Any photos you import will be added to this library.
You can switch to another library you’ve created at any time.
Editing:
 Editing photos in another application:
You can do many editing tasks in iPhoto, such as rotating and cropping a photo, changing a color photo to black and white, adjusting exposure and contrast, and reducing red-eye.
If you want to make other changes to a photo, you can open it in another image-editing application, such as Adobe Photoshop.
Important: Nondestructive editing does not apply to photos in the iPhoto library that are edited in a separate application.
- Set your preferences to open photos in another application when you click the Edit button.
- Select the photo and click the Edit button to open it in the application.
- Edit the photo. When you’re finished, save the photo using the same name and file format.
Note: When you edit a RAW-format photo, iPhoto creates a copy of the photo in JPEG format. This is the photo that opens in the other application.
To edit the photo in its original RAW format, you must set that preference separately from your edit preference.
To do so, choose:
- iPhoto > Preferences and click Advanced.
- Select the "Use RAW when using external editor" checkbox.
When you are finished editing, you must save the edited version on your computer and reimport it into iPhoto.
You can change your preferences so your photos open in edit view when you double-click them.
To do so, go to:
- iPhoto > Preferences and click General.
- Select “Edits photos” from the Double-click options.
Editing billing information:
If you need to make changes to your billing information for your Apple ID, follow these steps:
- Verify that your computer is connected to the Internet, then open the application.
- Select a photo from your Library by clicking it one time.
- Aperture: Choose File > Order Prints - iPhoto: Choose Share > Order Prints.
- Click either Account Info or Set Up Account.
- Enter your Apple ID and password where prompted and click Sign In. Learn more about Apple ID accounts.
- As soon as you sign in, the ordering system will automatically enable 1-Click ordering on your account.
- To make changes to your billing information, click "Edit Billing." Enter any desired changes and click "OK" on the bottom right to save your changes.
- Click Cancel (your account info will still be saved).
Editing text in a book:
Most book themes include pages that contain text you can edit.
If you don’t see any text on a page and you want to add some, you need to choose a new design for your page that includes text.
To edit text:

- Click the Page View button to display book pages in the photo browser.
- Select the page that contains text you want to edit.
- Click the text you want to edit, and then add or edit text.
To do so, drag the size slider.

iPhoto offers an automatic spell checker to help you eliminate spelling errors.
Even better, you can have iPhoto read your text aloud, so you can hear if it stumbles over a typo or some awkward language.
Highlight the text you want to hear, then Control-click it and choose:
- Speech > Start Speaking from the shortcut menu.
To turn off the automatic spell checker, choose:
- Edit > Spelling.
- Click “Check Spelling as You Type” to deselect it.
Editing photos in a separate window:
You can open a photo in a separate window and use the edit toolbar to perform a variety of photo-editing tasks.
Make sure your preferences are set to open a photo in its own edit window when you click the Edit button.
- Choosing what happens when you click the Edit button ►
- Select the photo and click the Edit button to open it in its own edit window.
- Use the editing tools to edit your photo.
To do so, go to:
- iPhoto > Preferences and click General.
- Select “Edits photos” from the Double-click options.
Editing/Renaming a folder, album, book, calendar, card, or slideshow:
After you’ve created a folder, album, book, calendar, card, or slideshow, you can change its name.
To rename an item in the Source list:
- Double-click the name of the item.
- Edit the name or type a new one.


