 Export Settings:
You can customize the export settings when you export a movie to QuickTime.
To customize these settings:
- Choose File > Export.
- Choose Expert Settings from the Formats pop-up menu.
- Click the Export button.
- Choose Movie to QuickTime Movie from the Export pop-up menu.
- Click the Options button.
- Click the Settings button in the Video panel to see the compression, frames per second (frame rate), and key frame settings.
- Click the Size button in the Video panel to customize the frame size.
Codec options:
- MPEG-4 is the standard codec (compressor/decompressor) used for Internet movies. To get the MPEG-4 codec option, you must have QuickTime 6 or later.
- For movies that will be viewed on earlier computer systems, you may want to use the Motion JPEG codec.
- The Sorensen codec is good for viewing movies on later systems. For earlier systems, use Cinepak or Motion JPEG.
- Pick a movie frame size first. Primarily, frame size determines the movie's file size.
- Set the number of key frames next. If the number of key frames is high, the movie will play back at higher quality, but the file size will be larger. With lower keyframe numbers, the video quality may be lower, but the file size will be smaller.
- Set the frame rate last. You may get choppy video playback if you set the frame rate to less than 12 frames per second. But higher frame rates create larger file sizes.
Exporting a movie from iMovie HD to iPod:
Want to put your own movies on your iPod? You can with iMovie HD and an iPod with video compatibility (currently Fifth Generation iPod). You also need to have QuickTime 7.0.3 or later and iTunes 6 or later installed—they're both free downloads! If you're not sure what iPod model you have, click here.
- Find out which version of QuickTime you have here or download the latest version from here.
- Find out which version of iTunes you have here or download the latest version from here.
- You can also download and install the latest iMovie, QuickTime, and iTunes updates using Software Update.
- In iMovie HD 6, open the movie you want to transfer.
- If you only want to transfer a portion of your movie, select the clips you want to transfer in the timeline viewer.
- From the Share menu, choose iPod.
- Click to select the "Share selected clips only" checkbox if you only want to share clips you selected.
- Click Share.
- iMovie HD compresses your movie and saves it to your iTunes library. The time it takes to save the movie depends on the movie's length.
- Open iTunes 6.0 or later, and then sync with your iPod.
- For more information about syncing, see the documentation that came with your video-compatible iPod.
- Open iMovie HD and create a movie, or open an existing movie in the application.
- From the File menu, choose Share.
- Click the QuickTime tab.
- From the Compress movie for pop-up menu, choose Expert Settings.
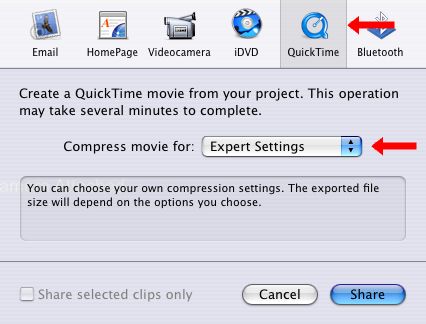
- Click Share.
- From the Export pop-up menu in the resulting dialog, choose Movie to iPod (320X240).
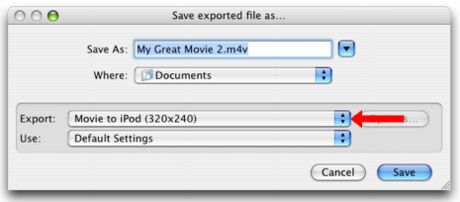
- Click Save to start the export process. Depending on the length of your movie, this can take a long time. iMovie uses H.264 compression to create the movie file (video iPod format), which will appear on your hard disk in the location you saved it when iMovie is done. Open the new file in QuickTime Player and play it to make sure it looks as you expect.
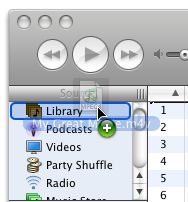
- Open iTunes 6 and drag your new movie file icon to the iTunes library in the Source list. To learn how to browse and view videos in iTunes, click here. Note: iTunes won't let you drag the movie to the Video playlist, but once you drag it to the Library, it will automatically appear in the Video playlist. You can also drag the video file to a playlist you create or directly to the iPod in the Source list.
- To copy the movie onto a Fifth Generation iPod, either sync it with your iPod or manually copy it. To learn how to sync video to your iPod click here, check out the iPod tutorial, or check the Features Guide that came with your iPod.
A note about copyright: This software may be used to reproduce materials. It is licensed to you only for reproduction of non-copyrighted materials, materials in which you own the copyright, or materials you are authorized or legally permitted to reproduce. If you are uncertain about your right to copy any material, you should contact your legal advisor.
Exporting your movie for viewing in PAL or NTSC format:
When you first create a new project in iMovie HD, you can select a video format for the project. The video and images you later add to the iMovie are converted to this format. However, if you need to format your movie to be viewed on a VCR or DVD player that uses another format, you can use the expert export options to convert your movie.
NTSC is a format commonly used in North America and Japan. PAL is a format commonly used by devices in Europe. There are also different versions of these two formats, such as DVCPRO-PAL and DVCPRO50-NTSC, so determine the precise format you need before exporting.
To export a movie in NTSC or PAL format:
- Choose Share > QuickTime.
- Choose Expert Settings from the "Compress movie for" pop-up menu, and then click Share.
- Type a name for your movie and choose where you want to save it.
- Choose "Movie to QuickTime Movie" from the Export pop-up menu, and then click Options.
- In the Video pane, click Settings to open the Compression Settings dialog.
- Choose a format from the pop-up menu (DV-PAL or DVCPRO-PAL for Europe, DV-NTSC or DVCPRO-NTSC for North America and Japan).
- Choose a value from the Frames Rate pop-up menu (25 for PAL and 29.97 for NTSC)
- Drag the Quality slider to the desired quality. Best is recommended.
- Click OK.
- Click Size to open the Export Size Settings dialog, and then click "Use custom size."
- Type a value in the Width field (720 for both PAL and NTSC) and in the Height field (576 for PAL and 480 for NTSC), and then click OK.
- Click Settings in the Sound pane.
- Choose Stereo (L R) from the Channels pop-up menu in the Sound Settings dialog.
- Choose 48.000 from the kHz pop-up menu (or type it in the Rate field).
- Choose 16 from the "Sample size" pop-up menu, and then click OK.
- Click OK in the Movie Settings dialog.
- Click Save.
Exporting movies with expert settings:
The export options provided in iMovie HD will work in most cases if you plan to use a QuickTime format. If you want to use a different format, such as MPEG-4, and have some experience with custom settings, you can create your own export settings.
For example, if you want to share your movie with someone who uses an older Windows computer, you can export your movie as an image sequence, then choose the JPEG option.
iMovie HD supports exporting in the following file formats:
- 3G
- AVI
- BMP
- DV Stream
- FLC
- Hinted Movie
- Image Sequence
- MPEG-4
- Picture
- QuickTime Movie
- Sound to AIFF
- Sound to System 7 Sound
- Sound to Wave
- Sound to uLaw
iMovie also supports many sound compression formats, such as 24-bit Integer, 32-bit Integer, 64-bit integer, Alaw 2:1, AMR NarrowBand, IMA 4:1, MACE 3:1, Qualcomm PureVoice, and many more.
So if you're fairly expert at understanding video file formats and compression characteristics, use the expert settings to set up your files the way you want.
To export your movie with expert settings:
- Choose File > Export.
- Choose Expert Settings from the "Compress movie for" pop-up menu, and then click Share.
- Choose the type of export format you want, and then click Options.
- Set the compression format (known as a "codec"). Sorenson Video, DV-PAL, and Motion JPEG A are examples of codecs. Depending on the type of export you choose (such as "Sound to AIFF" or "MPEG-4"), you see different codecs and compression options.
- Set the frame size. This setting affects the overall file size of your movie. Better quality creates a larger file size.
- Set the key frame number. A low number (such as every ten frames) creates a better-quality movie with a larger file size.
- Set the frame rate last. You may get choppy-looking video playback if you set the frame rate to less than about 12 frames per second.
Exporting a movie to iDVD:
Once your movie is ready for viewing, iMovie HD can automatically export it to an iDVD project that you can burn on a DVD. You can then view your DVD on a television using a DVD player or on your computer screen using the Apple DVD Player.
Note: Before you export your movie to iDVD, you can add chapter markers to it so that viewers can quickly review different sections of the movie on DVD. If you've added chapter markers, they are exported with your movie, and you can use them to add scene selection menus to your iDVD project.
Not all computers support iDVD. See your computer's manual to find out if your computer does.
To export your movie to iDVD:
- Choose Share > iDVD.
- Click the "Share selected clips only" checkbox if you only want to share clips you selected.
- Click Share.
For more information about using iDVD, choose Help > iDVD Help when iDVD is open.
Tip: You can automatically export video to iDVD from your camcorder using the Magic iMovie feature.
Exporting your movie for viewing on Apple TV:
You can watch your movie on Apple TV by exporting it from iMovie HD to your iTunes library, and then using iTunes to stream the movie to Apple TV or sync your Apple TV with your iTunes library.
IMPORTANT: To export a movie for viewing on Apple TV, you must have QuickTime 7.1.5 or later and iTunes 7.1 or later installed on your computer. For the latest versions of these applications, open System Preferences, click Software Update, and then click Check Now.
Before following these instructions, make sure you set up Apple TV for streaming or syncing video. For more information, see the documentation that came with Apple TV.
If you export a movie for viewing on Apple TV, you won't be able to watch it on an iPod. To learn how to transfer your movie to an iPod, see Related Topics below.
To export your movie for viewing on Apple TV:
- In iMovie HD, open the movie you want to export.
- Choose Share > QuickTime.
- Choose Expert Settings from the "Compress movie for" pop-up menu.
- Click Share.
- In the "Save exported file as" window, choose "Movie to Apple TV" from the Export pop-up menu.
- Choose a location for the movie you're exporting from the Where pop-up menu, and then click Save.
- Open iTunes.
- Drag your exported movie to the iTunes Movies library.
- Use Apple TV to view your movie.
IMPORTANT: Do not delete the exported file from the location you chose in step 6 unless you have iTunes set up to copy files to the iTunes Music folder when you add them to iTunes. To see if this option is turned on, open iTunes, choose iTunes > Preferences, click Advanced, and then click the General tab. If the "Copy files to iTunes Music folder when adding to library" checkbox is selected, you can delete the exported file from the location you chose in step 6.
Customizing your QuickTime export:
If you want to set your own QuickTime settings for your exported iMovie projects, use the QuickTime expert export settings.
To use the expert QuickTime settings:
- Select your project in the Project Library and choose Share > Export Using QuickTime.
- Type a name for the movie in the Save As field and choose a location to save the file from the Where pop-up menu.
- Make your selections for format, compression, and other variables, and then click Save.
Exporting your movies to a Finder folder:
When you share your project with iTunes or the Media Browser, iMovie renders it and makes the rendered versions accessible only through iTunes or the iLife Media Browser.
If you make further edits to your project after you’ve prepared it for sharing or sent it to iTunes, the title bar indicates that your project is out of date and needs to be rendered again. Old versions of the movie in the iTunes or the iLife Media Browser are deleted and replaced by new ones when you render it again.
If you want to save the current version of your movie before you edit it, or if you simply want to create a copy you can access on your desktop or any Finder folder, you need to export it as a movie. Exported movies are identical to the movies that are rendered when you share with iTunes or the Media Browser, but they are accessible through the Finder and can be used by any application that doesn’t have access to movies in iTunes or the Media Browser, such as Mail.
When you export your movie, iMovie gives you four size options:
- Tiny: Always 176 by 144 pixels.
- Mobile: Always 480 by 272 pixels.
- Medium: Varies in size from 640 by 480 pixels (standard aspect ratio) to 640 by 360 pixels (widescreen), depending on the size of the media in your project.
- Large: Always 960 by 540 pixels (widescreen). No large size is rendered if your original video isn’t high definition (HD).
The dots below each device in the table of sizes indicate which movie sizes are recommended for use with that device.
Hovering the pointer over the “i” next to the movie dimensions displays the following information for the rendered movies:
- H.264: The standard video compression that's used in the movie.
- fps: The frame rate of the movie in frames per second.
- Kbps: The maximum rate at which the movie can be streamed over the Internet in kilobytes per second.
- MB: The size of the movie file in megabytes.
To export your project to the Finder:
- Choose Share > “Export Movie.”
- Type a name for the movie in the Export As field, and then choose the location where you want to save it in the Where pop-up menu.
- Select the size that best matches what you’ll be using the video for.
- Click Export.
- To find your exported movie, navigate to the folder that you chose in the Where pop-up menu.
Exporting a presentation from Keynote to iMovie:
With Keynote you can export your presentation to a number of file formats.
Follow these steps to create a file that you can use in iMovie:
- Open your presentation in Keynote
- Choose File > Export.
- Select QuickTime as the file format.
- Select "Fixed Timing" for playback. Do not select the manual advance option; the resulting file may not import into iMovie.
- Select "Full Quality Large" for the format setting.
- Click Next.
- Name and save your movie.
- Open iMovie
- Choose File > Import Movies.
- Locate your movie, saved in step 7 above.
- Click Import.