- Select an item in your Source list.
- Choose File > Print.
- Select print options.
- To see exactly how your pages will look before printing them, click Preview.
- Click Print.
Printing a Contact Sheet:
Photographers often create contact sheets — quick-reference prints containing small versions of multiple photos, usually an entire roll's worth on each contact sheet. (The term derives from the traditional technique: a contact sheet is created by sandwiching negatives between a piece of glass and photographic paper, and then exposing the sandwich to light.)
To include only certain photos on a contact sheet, select them before choosing the Print command. You can use contact sheets to provide an at-a-glance reference for a series of photos.
But you can also use a contact sheet to squeeze several images onto a single sheet of paper.
 Check the Save paper box to have iPhoto print vertical images in horizontal orientation, even if you rotated them.
You'll have to turn the sheet sideways to view some images, but you'll get more images on each sheet of paper.
Tip: You can use contact sheets to print multiple copies of one photo. Simply select only one photo before choosing Print.
Printing borderless photos:
To print photos without a border:
- Select the photo or photos you want to print.
- With the photo or photos selected, click the Print button. The photos appear in print project view.
- Choose Standard from the themes menu on the left.
- Select the printer.
- Choose a paper size from the Paper menu (such as 4 x 6 or 8 x 10). The word “borderless” appears next to the sizes where this option is available. If you don’t see “borderless” as an option, either your printer doesn’t support borderless printing or you may not have the right driver installed. See Mac Help for information.
- Do one of the following: If you like the way the photo looks, and you are ready to print, click Print. If you want to adjust the photo before you print, you can zoom in or out, or move the image within the frame. To do so, click the Customize button, and then follow steps 7-9.
- Click the photo. The zoom slider and hand tool appear at the top of the photo.
- Use the zoom slider to zoom in or out of your photo. Click the hand tool to move the photo around in the frame. If you want to further edit or customize your photo for printing, use the options in the Customize toolbar. Note: These changes will appear only in the prints you make with this print project. They will not appear in your library, albums, books, calendars, cards, or slideshows.
- When you are finished editing, click Print.
Printing your own photos:
You can print your photos in a number of ways, including full page (with borders), in standard print sizes, as contact sheets, or bordered with a mat effect.
You can also edit your photos in print view. These edits are done strictly for the purpose of the print project and will not appear on the photo in your iPhoto library.
Important: If you want to print borderless (or “full bleed”) photos, print photos on perforated paper, or design greeting cards and postcards with multiple photos and a range of themes, see Related Topics below.
To print your own photos:
- Select the photo or photos you want to print.
- Click the Print button.
 Your selected photos will appear in Print Settings view.
 - Choose a theme from the menu on the left. The preview area shows how your photos will look when you print them.
- Choose your printer, paper type, paper size, and print size from the pop-up menus. These criteria are applied to all the photos in your print project.
- If you want to edit or further customize your print project, click the Customize button. This will open your photo project in print edit view and the print project icon will appear in the Source list. The icon will remain in the Source list until you cancel the print project. For more about this topic, see Related Topics below.
- Click Print.
Printing photos on perforated paper:
To print photos on perforated paper:
- Select the photo or photos you want to print.
- Crop each photo to match the size ratio you want to print (such as 4 x 6, 5 x 7, and so on). For more information, see Related Topics below.
- Click the Print button. The photo or photos appear in print project view.
- If you want to make any more edits to the photos before you print them, click the Customize button and then click either the Adjust button or the Settings button. For more information about editing photos to print, see Related Topics below.
- Choose Standard from the themes menu on the left.
- Select a printer.
- Select perforated paper from the Paper Size menu. If you don't see an option for perforated paper, either your printer doesn’t support it or you may not have the right driver installed. See your printer documentation for information.
- Select the size print you want to make (such as 4 x 6 or 8 x 10).
- Click Print.
Printing multiples photos:
The ability to print multiples of a photo on a single page (also known as the N-Up style in iPhoto '06) using a home printer is still a prominent feature in iPhoto '08.
Its location, however, has changed slightly for iPhoto '08.
To print multiples of a specific photo on a page in iPhoto '08:
 Select a picture or group of pictures you would like to print.
- Select the Print icon on the bottom right of the application.
- Print Size to anything other than the Standard Size. (This sets the number of pictures to be printed on a single page)
- Once you select the Print Size, select the Customize... button.
- Select the Settings icon.
- In the Settings window, change the Photos Per Page option to Multiple of the same photo per page.
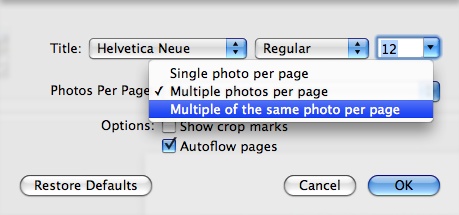
- Select the OK button in order to see the changes made to your page.
- Select the Print page to print your page as you see it in Print Customization mode.
Editing photos in print project view:
You can edit a photo, or a set of photos, for a particular print project without affecting the same photos in your photo library. For example, you can print a photo in sepia tone, but not save it that way in your library.
To edit photos in print project view:
- Select one or more photos to print.
- Click the Print button in the toolbar.
- Select a theme in the menu to the left.
- Click the Customize button.
Edit your photos using one of the following tools:
Themes: Choose or change the theme for your photos.
Background: Choose the border color to frame your photos. (If you don’t see the color change, click the Borders button to choose an option that has borders.)
Borders: Choose the style for your photo borders.
Layout: Choose how many images to include in a single print. Some layouts offer captions as well. (Multiple images are not available for all themes.)
Adjust: Edit your photo’s contrast, saturation, sharpness, and more, or add special effects, such as black-and-white or antique.
If the Adjust button is dimmed, select a photo in the viewing area of the print window. You can move through multiple photos by using the arrows, or by clicking the Page View button, then selecting print pages in the browser.
Settings: Choose font and type size for captions, or specify one photo per page and whether or not to include crop marks.
Note: To change the background or border of a single photo in a print project, select the photo you want, and then hold down the Option key while you make your selections.
If you want, you can zoom in and crop your photo just for this print project. Click the photo once to make these tools appear at the top of the photo.
Use the slider to zoom in on the photo, and use the hand pointer to move the photo around in the frame.
Click Print Settings to return to the Print dialog.